Homemade Applesauce Canning Recipe
By cwyorkiex3
Warm homemade applesauce is a comforting delight of the harvest season. Nothing in a jar at the supermarket can compare to freshly stewed and spiced apples.
Ingredients
- Add, if desired:
- 12 pounds of fresh apples
- 1 gallon of water
- 3/4 cup lemon juice
- 1 cup brown sugar
- 1 tablespoon cinnamon
- Dash of salt
Details
Servings 5
Preparation time 10mins
Cooking time 60mins
Preparation
Step 1
Start with approximately 12 pounds of fresh apples free of blemishes and bruises. Minor blemishing can be cut out but always make sure you are using high quality fruit.
Have ready a large water bath canning kettle (readily available at discount stores or hardware stores), pint sized Mason canning jars with brand new lids. You will also want a canning jar lifter and a candy thermometer.
Peel and core the apples. This is admittedly a lot of work and investing in a hand crank apple peeler is recommended. After peeling, slice the apples. Because it will take a while to get all the apples peeled have a large pan with about 1 gallon of water with 3/4 cup lemon juice in it. Put the apple slices in the lemon water as you work to prevent browning of the fruit.
Once all fruit is peeled and sliced drain it from the lemon water and add it to a large stock pot and heat on the stove over medium heat. Cover the stock pot, but check frequently to make sure that the fruit is not scorching on the bottom. Water will soon start cooking out of the fruit and this will protect against scorching after the first few minutes. Keep the pot covered so that the fruit simmers and steams. Check every couple minutes and stir the fruit. Depending on the firmness of the apple variety you selected, the apples should become noticeably softened in about 20 or 30 minutes.
Once apples are softened and beginning to break apart when stirred, start mashing them with a potato masher. This speeds the saucing process. You can make the apples as smooth or as chunky as you want. Keep the applesauce cooking after you mash to cook out more liquid. You don't want the applesauce runny. Cook out the water until a thick sauce forms. During this time, you may add sugar and spice if you want.
You can add more sugar if you want it really sweet or not add any sugar. Having this control over the ingredients is one of the nice things about making your own applesauce. You don't have to worry about the high fructose corn syrup that is present in so many commercial varities.
While you are cooking the apples, get the water bath canner and the jars ready. Wash your jars, lids, and bands and fill the canner. Heat the water in the canner to at least 180 degrees F but less than boiling and submerge completely the jars and lids to sterilize. Use the candy thermometer to monitor water temperature. After the jars and lids have been sterilizing for a couple minutes, shut off the heat to the canner and cover it. The water and jars will stay hot while you're finishing the applesauce.
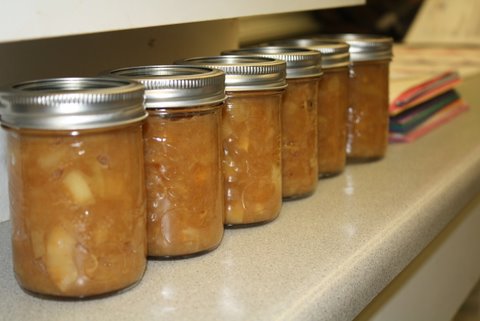
Once the applesauce achieves a thick consistency without any puddles of excess liquid, remove from heat. Take the sterilized jars and lids out of the water and fill with applesauce. Leave 1/2 inch headspace in jars. Carefully clean and wipe dry the rims of the jars and put on the lids. Secure the lids with the jar bands and screw tight with your hand. You don't have to make it really tight. Just screw it on without forcing it.
Bring the water in the canner to a full boil and carefully add the filled jars with the jar lifter. Make sure at least 1 or 2 inches of water are above the tops of the jars. Keeping the water at a boil, process the pints for 15 minutes. (If you used quart jars, process for 20 mintues.) Increase these times by 5 minutes if you are at elevations above 1,000 feet.
When processing time has elapsed, remove jars from water and place on a towel in a draft-free location. Do not disturb the jars for 12 to 24 hours while the seals cool and tighten. You may hear the lids pop down and make a seal within the first few minutes, but do not touch them.
The next day, remove the bands, wipe the jars and lids clean and store in a cool dark place for up to one year.
If you want to do both quart and pint jars at the same time, just use the processing time for the quarts. A little extra processing on the pint jars will not hurt anything.
You'll also love
-
 Meatballs in Caramelized Onion...
4.4/5
(54 Votes)
-
 Baked Stuffed Eggplant
4.5/5
(40 Votes)
-
 Shirley Temple Poke Cake
4.2/5
(60 Votes)
-
 Blackberry Strawberry...
4.5/5
(39 Votes)
-
 Lemon Cupcake with Lemon...
4.5/5
(37 Votes)
-
 Easiest Pineapple Cake
4.3/5
(50 Votes)
-
 Hasselback Potatoes with Garlic &...
4.5/5
(31 Votes)
-
 Coconut Rice with Sweet Chili Sauce
4.7/5
(12 Votes)

Review this recipe