Half Baked – The Cake Blog » DIY : Rainbow Sprinkle Cake
By NailCandy
 1 Picture
Ingredients
- Supplies:
- RAINBOW SPRINKLE CAKE
- a DIY by Kate Wagner
- Cake
- Buttercream Icing
- Turntable or Lazy Susan
- Angled Spatula
- 2 Cardboard Cake Circles (Ideally the same size as your cake but no less than 1″ smaller and definitely not larger)
- Cake lifter
- Large Shallow Tray
- Approx 1kg Rainbow Sprinkles
- Spoon
- Small Rice Bowl (or similar)
Details
Servings 1
Adapted from thecakeblog.com
Preparation
Step 1
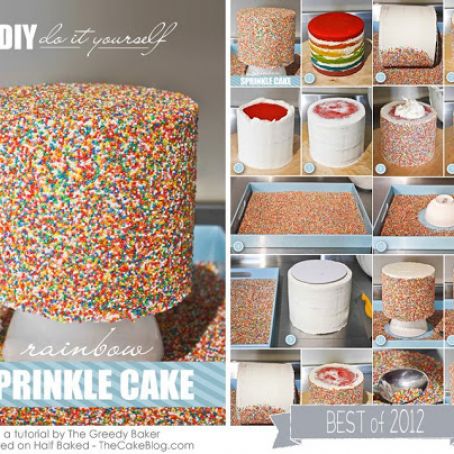
STEP 1: Begin with the cake you wish to cover and place it on a cake circle base.
STEP 2: Creating a nice crisp finish, coat the outsides of the cake with a reasonably thick layer of icing. Only coat the outside making sure to take the icing above the top rim of the cake.
STEP 3: Bring the icing into the center of the cake and remove excess. We are not looking to ice the top of the cake at this stage. Using the cake lifter, lift the cake off the turntable and chill in the freezer for 5 minutes.
STEP 4: While waiting for the cake to chill pour the Rainbow Sprinkles into a large shallow tray.
STEP 5: Remove the cake from the freezer and place the 2nd cake circle on top of the cake.
STEP 6: Using the cake lifter, lift the cake and gently lay on it’s side in the tray Sprinkles. Supporting the cake with your hands on either side, roll until you have an even layer of Sprinkles adhered to the Buttercream.
STEP 7: Place the cake back on the turntable.
STEP 8: Next blob a generous amount of Buttercream on top of the cake.
STEP 9: Smooth evenly with the angled spatula, removing any excess. Chill in the freezer for a further 5 minutes.
STEP 10: Upturn the small bowl and place in the center of the Sprinkle tray.
STEP 11: Remove cake from freezer and place on top of the upturned bowl, being careful to balance the cake correctly.
STEP 12: Spoon a large amount of Sprinkles on top of the cake and smooth around to edges using the angled spatula, pressing gently as you go to make sure they adhere to the Buttercream.
STEP 13: Neaten up any missed areas around the edge using the spoon and spatula as shown.
STEP 14: Admire your finished cake! This fun cake is sure to brighten up any day.
If you are feeling adventurous why not create 2 or more tiers and finish with some bright ribbon and a gumpaste rainbow for a super cheerful effect!

Review this recipe