
Pan de Muerto: Bread of the Dead
I have a confession to make: I’ve never made anything with yeast outside of a bread machine. Even worse, every year, I bribe my students with extra credit to do something I’ve never done: make Pan de Muerto and feed us all with it!
Pan de Muerto is an essential element of the celebration of Days of the Dead. The Days of the Dead are a fascinating holiday primarily celebrated in Mexico and where populations of Mexicans thrive. Pan de Muerto is a special bread for the holiday and bakeries make an abundance of it for their customers.
The Days of the Dead honor family members who’ve passed. There is a common belief that the spirits of the dead are allowed to return on these days, so families construct altars to honor and please them. So the altars are personalized for family members, but there are some common, essential elements of which Pan de Muerto is one.
I love the entire view that the Mexican culture has about death. They don’t fear it. In fact, many Mexicans believe that life is just the first stage of existence, and death leads to the next. So the people are happy during the Days of the Dead, and visitors would see a lot of funny (and sometimes edible) images of skeletons, skulls, and the fun existence of the dead – really!
If you are interested in learning about the Days of the Dead, I recommend Wikipedia (http://en.wikipedia.org/wiki/Day_of_the_Dead) for a captivating read.
For my Pan de Muerto, I used my favorite recipe (from tasting the results of my students). It comes from Global Gourmet. I didn’t change it at all, mainly because I didn’t know what I was doing! (he he). The texture and base of the bread reminds me of Challah, which is a favorite.
Pan de Muerto's got butter and eggs in the dough. Oh, and it has sugar and anise seeds. If you're not a big fan of the flavor of anise, don't worry! It's not at all overwhelming. In fact, the flavor of the anise is subtle and pleasant. I can say that, because I'm not a huge anise fan - yet this is my favorite recipe for this bread. Then, to make it all even better, there's a somewhat sticky and delicious orange glaze on top. Yum!
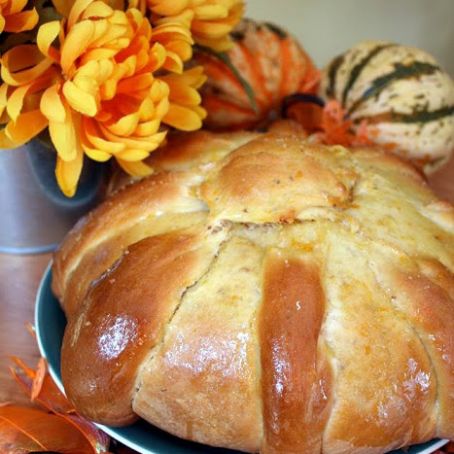
I tried to make a very traditional shape that I see in pictures, but I will admit, that my loaves came out looking like pumpkins. But the flavors where right, and I just love eating this bread. The next day, I tried making skulls and crossbones, and skulls with bones coming up the sides. Oh, and I made a bone to give to my friend, AnnMarie.
So, in all, I made four huge loaves to bring to my students, and one small one (the bone) for AnnMarie, but I wanted to make sure I had a little for myself. So I made a little mini loaf that I tied to decorate with some colored sugar.
It sure was a tasty treat to have it warm, right out of the oven, no butter needed!
Well, I've done enough "talking" now, so here's the wonderful recipe.
 1 Picture
Ingredients
- For the Bread:
- 1/2 cup butter
- 1/2 cup milk
- 1/2 cup water
- 5-1/2 cups flour (it will be divided and used throughout the mixing)
- 2 packages dry yeast
- 1 teaspoon salt
- 1 tablespoon whole anise seed
- 1/2 cup sugar
- 4 eggs
- For the Glaze:
- 1/2 cup sugar
- 1/3 cup fresh orange juice
- 2 tablespoons grated orange zest
Details
Servings 1
Adapted from inspiredbites.blogspot.com
Preparation
Step 1
In a saucepan over medium flame, heat the butter, milk and water until very warm but not boiling.
In a large bowl, place 1-1/2 cups flour, the yeast, salt, anise seed and sugar. Add in the warm liquid you just made and mix until well combined.
A note about the mixer:
I wish I had one of those cool, Kitchen Aid standing mixers, but I don't. In fact, I think that is one of the reasons that I've always avoided making bread. Instead, I have a hand mixer. But it did come with a bread-type attachment. I began using it when I noticed that the beaters just weren't working, and the dough was climbing up to the top of them, and above. So I tried the other mixer attachments for the first time.
Add the eggs and beat in another 1 cup of flour.
Continue adding more flour, one cup at a time, until the dough is soft but not sticky. I'll admit, I had a hard time incorporating everything.
Knead on lightly floured board for ten minutes until smooth and elastic. I was pleased with how the dough was looking at this time.
Lightly grease a bowl and place dough in it, cover with plastic wrap and let rise in warm place until doubled in bulk, about 1-1/2 hours.
Here's what I found to be the most difficult part: Shape the dough. This was something completely new to me. I have unimagined respect for bread makers at this point.
The dough is very elastic. I'd shape it into bones, and it would shrink. I'd find that some parts of it didn't stick to the main loaf well, so I tried a little egg wash. But sometimes, as the loaf sat raising again (you need to let it rise an hour once it is shaped) in it's new shape, it would unattach. Sometimes I ended up poking in toothpicks. That worked!
I shaped some of the loaves into the traditional shape (shown at the top of this post), but I also tried some loaves resembling skulls, skeletons or round loaves with "bones" placed ornamentally around the top.
Once the dough is shaped, let these loaves rise for 1 hour before baking.
Bake in a preheated 350 F degree oven for 40 minutes. Remove from oven and paint on glaze.
For the Glaze:
Bring all the ingredients to a boil for 2 minutes, then apply to bread with a pastry brush. If desired, sprinkle on colored sugar while glaze is still damp.
Review this recipe